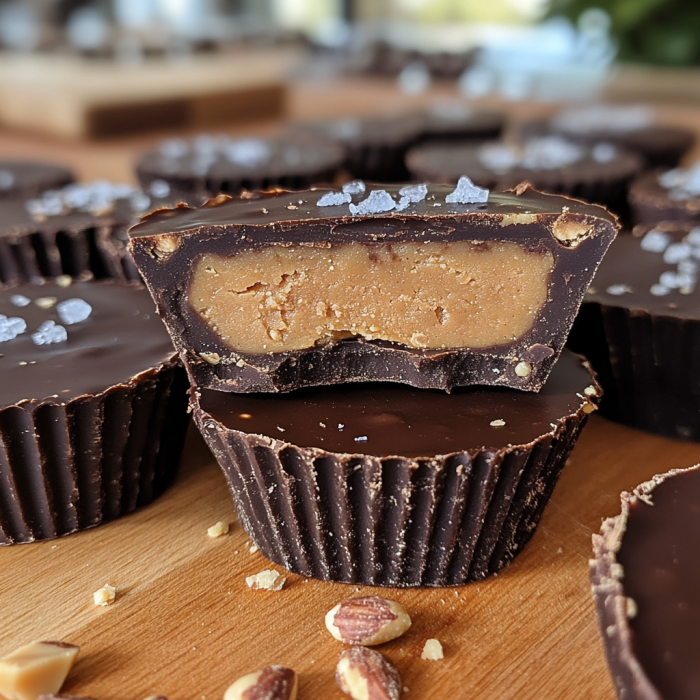
Rich, indulgent, and packed with protein, these Protein Peanut Butter Cups offer a healthier twist on the classic treat. Perfect for a post-workout snack, an energy-boosting dessert, or a guilt-free indulgence, these homemade peanut butter cups combine creamy peanut butter with high-quality protein and a luscious chocolate coating. Not only are they easy to make, but they also contain fewer preservatives and additives than store-bought options.
Why You’ll Love This Recipe
- High in Protein: With added protein powder, these treats help support muscle recovery and keep you feeling fuller longer.
- Healthier Alternative: Made with natural ingredients and free from artificial sweeteners, this is a nutritious way to satisfy your sweet tooth.
- Easy to Make: No complicated techniques are required, and they come together in minutes.
- Customizable: Adjust the sweetness, chocolate type, or even swap out peanut butter for other nut butters.
- Perfect for Meal Prep: Make a batch and store them in the fridge or freezer for an easy grab-and-go snack.

Ingredients
- Dark chocolate or milk chocolate
- Peanut butter (natural or creamy)
- Vanilla or chocolate protein powder
- Honey or maple syrup
- Coconut oil
- Vanilla extract
- Sea salt (optional)
Directions
- Prepare the Chocolate Coating: Melt the chocolate with coconut oil in a microwave-safe bowl, heating in 30-second intervals and stirring in between until smooth.
- Create the Base Layer: Line a muffin tin with cupcake liners. Spoon a small amount of melted chocolate into each liner, tilting the tin to ensure even coverage on the bottom. Place in the freezer for about 10 minutes to set.
- Make the Peanut Butter Filling: In a mixing bowl, combine peanut butter, protein powder, honey (or maple syrup), and vanilla extract. Stir until a smooth, thick paste forms.
- Assemble the Cups: Remove the muffin tin from the freezer and place a spoonful of the peanut butter mixture on top of the hardened chocolate layer. Smooth it out gently with the back of a spoon.
- Top with More Chocolate: Pour the remaining melted chocolate over each peanut butter layer, ensuring full coverage. Sprinkle with sea salt if desired.
- Chill and Set: Return the muffin tin to the freezer for another 15–20 minutes or until fully set.
- Enjoy: Once set, remove the cups from the liners and enjoy your homemade protein peanut butter cups.
Variations
- Different Nut Butters: Swap peanut butter with almond butter, cashew butter, or sunflower seed butter for a different flavor profile.
- Dairy-Free Option: Use dairy-free chocolate and plant-based protein powder for a vegan-friendly version.
- Crunchy Texture: Add crushed nuts or cacao nibs for extra crunch.
- Lower Sugar Version: Use a sugar-free chocolate alternative and stevia or monk fruit sweetener instead of honey.
Servings and Timing
- Prep Time: 10 minutes
- Cook Time: 0 minutes (only melting involved)
- Chill Time: 20–30 minutes
- Total Time: 30–40 minutes
- Servings: Approximately 12 peanut butter cups
Storage/Reheating
- Refrigeration: Store in an airtight container in the fridge for up to 2 weeks.
- Freezing: Keep in the freezer for up to 3 months. Let them sit at room temperature for a few minutes before eating.
- Reheating: No need to reheat, but if they become too firm, let them soften slightly at room temperature before enjoying.
FAQs
1. Can I use whey protein powder?
Yes! Whey protein works well, but if you prefer a plant-based option, use pea or almond protein.
2. What chocolate works best for this recipe?
Dark chocolate (70% or higher) is the healthiest choice, but milk chocolate or sugar-free options also work.
3. How do I prevent the peanut butter filling from being too runny?
If the filling is too soft, add more protein powder or refrigerate it for a few minutes before assembling the cups.
4. Are these keto-friendly?
Yes, if you use sugar-free chocolate and a low-carb sweetener like stevia or monk fruit.
5. Can I make this nut-free?
Yes! Use sunflower seed butter instead of peanut butter.
6. How can I make them crunchier?
Add chopped nuts or crispy rice cereal to the peanut butter mixture.
7. Can I use cocoa powder instead of melted chocolate?
Not recommended, as melted chocolate provides the necessary structure and texture.
8. What’s the best way to melt chocolate?
Use a microwave in short bursts, stirring in between, or melt it over a double boiler for better control.
9. How do I prevent the chocolate from cracking?
Make sure the bottom layer is not too thick and allow the cups to come to room temperature slightly before eating.
10. Can I make mini versions of these?
Absolutely! Use a mini muffin tin and adjust the quantities accordingly.
Conclusion
These Protein Peanut Butter Cups are a delicious, easy-to-make, and healthier alternative to traditional peanut butter cups. Packed with protein and free from unnecessary additives, they’re the perfect treat for any time of the day. Give them a try and enjoy a sweet indulgence without the guilt!
Print
Protein Peanut Butter Cups
- Total Time: 30-40 minutes
- Yield: Approximately 12 peanut butter cups 1x
Description
Rich, indulgent, and packed with protein, these homemade Protein Peanut Butter Cups are a healthier twist on a classic treat. Made with natural ingredients, they are perfect for a post-workout snack or a guilt-free dessert.
Ingredients
- 1 1/2 cups dark or milk chocolate, chopped
- 2 tbsp coconut oil
- 3/4 cup peanut butter (natural or creamy)
- 1/4 cup vanilla or chocolate protein powder
- 2 tbsp honey or maple syrup
- 1/2 tsp vanilla extract
- Pinch of sea salt (optional)
Instructions
- Prepare the Chocolate Coating: Melt the chocolate with coconut oil in a microwave-safe bowl, heating in 30-second intervals and stirring until smooth.
- Create the Base Layer: Line a muffin tin with cupcake liners. Spoon a small amount of melted chocolate into each liner, tilting the tin for even coverage. Freeze for 10 minutes.
- Make the Peanut Butter Filling: In a bowl, mix peanut butter, protein powder, honey (or maple syrup), and vanilla extract until a smooth, thick paste forms.
- Assemble the Cups: Remove the tin from the freezer. Add a spoonful of peanut butter mixture onto the hardened chocolate layer and smooth it out.
- Top with More Chocolate: Pour the remaining melted chocolate over each peanut butter layer, ensuring full coverage. Sprinkle with sea salt if desired.
- Chill and Set: Return to the freezer for 15–20 minutes or until fully set.
- Enjoy: Once set, remove from liners and enjoy.
Notes
- Storage: Keep in an airtight container in the fridge for up to 2 weeks or freeze for up to 3 months.
- Dietary Variations: Use dairy-free chocolate and plant-based protein for a vegan option. Swap peanut butter with almond or sunflower seed butter for allergy-friendly alternatives.
- Customization: Add crushed nuts or cacao nibs for extra crunch. Use sugar-free chocolate and monk fruit sweetener for a low-carb version.
- Prep Time: 10 minutes
- chill time: 20-30 minutes
- Category: dessert, snack
- Method: Baking
- Cuisine: American
Keywords: Protein Peanut Butter Cups, High-Protein Dessert, Healthy Peanut Butter Cups, No-Bake Treat, Homemade Candy


No comment